This article shows you how to download and install Android SDK to get you started developing Android Application.
Now get started to accomplish these objectives. Follow these points.
1. Install Java (If it is not on your machine)
- Goto http://www.oracle.com/technetwork/java/javase/downloads/index.html
- Click on Download JDK button

- Select Platform and Language for your download and accept the license Agreement

- Click on continue button. Then Click on jdk-6u23-windows-i586.exe for download

- Now save file and install the JDK.
2. Install Eclipse
- Go to http://www.eclipse.org/downloads/ .Click on Windows 32 Bit from the right side download icon of Eclipse IDE for Java Developers row.

- Click on download icon.

- After downloading, Unzip this file.
- Now you open eclipse.exe file from your unzip folder directory. You will see this.

- Set your workspace directory. Then click ok
3. Install ADT Plugin
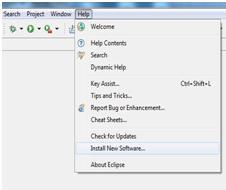
- Start Eclipse, then select Help > Software Updates or Help > Install New Software. In the dialog that appears, click the Available Software/Install New Software tab.
- Click Add Site.
- · In the Add Site dialog that appears,
- Copy and paste this link into input box “Location/Work with”: https://dl-ssl.google.com/android/eclipse/

- Back in the Available Software view, you should see the plugin. “Android Developer Tools”, and “Android Editors” should both be checked. The Android Editors feature is optional, but recommended. Then click on the button “Install”
- Click on the button Next
- Accept the license agreements” and click Finish.
- Eclipse will ask to restart, click on the button Yes.
- After restart, update your Eclipse preferences to point to the SDK directory.
4. Download Android SDK
- Download the Android SDK from the Android homepage under Android SDK download . The download contains a zip file which you can extract to any place in your file system, e.g. I placed it under “C:\android”.

5. Configuration
- In Eclipse open the Preferences dialog via Windows -> Preferences. Select Android and maintain the installation path of the Android SDK. Click Apply, then OK.
- Now, set your PATH environment variable by right click on My Computer, and select Properties. Under the Advanced tab, hit the Environment Variables button, and in the dialog that comes up, double-click on Path under System Variables. Add the full path to the
tools/directory to the path, in this case, it is: ;C:\android\android-sdk-windows\tools. Then click OK , OK , OK.
6. Create an AVD
- You will run your application in the Android Emulator. Before you can launch the emulator, you must create an Android Virtual Device (AVD). An AVD defines the system image and device settings used by the emulator.
- To create an AVD, In Eclipse, choose Window > Android SDK and AVD Manager.

- Select Virtual Devices in the left panel.
- Click New.
- The Create New AVD dialog appears.
- Type the name of the AVD, such as “testAVD”.
- Choose a target. The target is the platform (that is, the version of the Android SDK, such as 2.2) you want to run on the emulator.

- Click Create AVD. Your new AVD is created now!
Hope so you well understand, in next article I'll show you to create first application like Hello World in Android application. Stay tuned.
Hi You are introduction on Android is amazing.
ReplyDeleteAndroid Development